The
Blooding
Game one
with the Wallenberg briefing from Nachtjäger
Points limit: 1700
My list: Panzerkampfgruppe Wallenberg
As much
infra-red equipment to take advantage of the spearhead move as I have models,
so in went 5 Panthers and a Panzersturm platoon. The idea is simple: spearhead
towards an objective, supported by the rest of the army. Get close to take
advantage of the Uhu’s rules. Pin enemy infantry, assault and push them away.
With Reluctant I have to be careful to take too much damage in one turn to get
a motivation check, so I need to watch my placement.

army list by Forces of War
My opponent’s list: Canadian Armoured Squadron
I battle
this opponent quite often, as he is considered one of the best players locally
and is an all-round nice guy. Games against him are always enjoyable, as we
tend to have the same problem with dice (aka, not rolling well when we should).
His army was what he had in his bag and is the same I already lost two times
to. I expected and hoped for a different list, but alas.

army list by EasyArmy
Scenario: randomly chosen, Pincer
Deployment:
I
decided to use the Night Attack capability of the briefing, as that meant I
would be attacking. I wanted to test how effective the spearhead could be,
coupled with the infra-red equipment and the abilities of the Uhu’s. With my
deployment, I wanted to make sure my opponent wouldn’t know immediately which
objective I was going for. He had one platoon of Shermans on the table on one
objective, the infantry platoon on the other. The other Shermans were in
Ambush, so I wanted to try to push up and deny him the opportunity to ambush
from concealing terrain.
With
that, my spearhead move was mainly towards the middle of the table, and the
small patches of woods around the lake. Also, I wanted the Panzersturm to use
the forest near the objective where the Canadian infantry was sitting, and be
supported by the Panzergrenadiers and 251/17s.

After deployment and the spearhead move
Turn 1:
Not much
happened, but it did demonstrate the speed of the army despite the Night
Fighting rules. Every platoon moved the maximum distance, with the Panzersturm
halftracks ready to deliver the infantry into the woods in the next turn, and
the Panthers all ready for an ambush.
And he
does pop his ambush! Oh fudge. And he still has room in concealed terrain. Uh
oh.
The
Shermans lets loose, but he misses everything. Wow. I know, Veteran + concealed
IS difficult to hit, but still. I got very lucky there as he got shots at side
armour.

The end of my turn 1.
Turn 2:
The
Panzersturm left their halftracks and pushed up through the woods. The
Panzergrenadiers and 251/17s moved up to support the coming assault. Then I try to pin
the Canadian infantry with everything I got, but guess what, I roll too low for
the Panzergrenadiers and 251/17s regarding visibility. I only get a few shots
in, but make 5 hits! Mainly due to the Panzersturm, as all bases are within
range thanks to the Uhu.
All the
Panthers stand still, get 2 shots each, aaaaaand... I bail two tanks. Uh oh.
Then the
assault on the Canadian infantry comes, suffering no casualties in defensive
fire, and I kill two bases. He fails his motivation check and is pushed back as
far as I can move my bases.
I
succesfully Stormtrooper all my Panthers away from the Shermans, as he’s not
going to roll poorly again. Well, I hope he does, but I can’t count on it.
He
starts his turn by remounting both Shermans, moves two Shermans into the side
armour of the Panthers there, but misses these shots, together with his Firefly
(yay)! He then smokes the Panthers in the middle with the remaining Sherman. He
digs his infantry in to enhance their survivability, and gets his 2iC in to
support them.

The end of my turn 2.
Turn 3:
I deploy
my Panzergrenadiers from their halftracks to help with the Canadian infantry,
move the rest of the halftracks up, and get my Panthers into range of his
Shermans. I shoot everything I have at the infantry, but don’t kill anything.
The Panthers open up, get hits, and I blow up the Firefly thanks to a successful
gun-tank roll. I also bail a Sherman. I try to assault with the Panzersturm
again, but they fail their Tank Terror test (thanks to the 2iC Sherman which
was now there). Good thing I brought the Panzergrenadiers as well! They
assault, get hit 4 times in defensive fire and avoid getting driven off, and
kill three bases. The Canadians then fail their motivation roll, and at the end
of the phase, fail their platoon morale check.
My
opponent then rolls high enough to end the darkness, doesn’t get his reserves,
but does get his Typhoon with 2 planes. There’s no place not being covered by
anti-air, so he goes for broke and attacks the 251/17s. He proceeds to move his
remaining Sherman platoon out of the woods towards the other side. In the middle, the
Sherman still in the woods stays bailed, and he once again tries to shoot my
Panthers in their sides... but misses again. Wow. Seriously? His 2iC kills two
Panzersturm bases and I fail the platoon morale check. And then his planes are
(predictably) shot down.

At the start of his turn 3
Turn 4:
I start
by pushing my right flank further up and spread out my halftracks for the
inevitable Canadian reserves and get the Panzergrenadiers ready to assault the lone Sherman.
The
Panthers move up and finally do something constructive by forcing the nearby
Shermans to take a platoon morale check, which they fail. My CiC takes a single
shot at the lone 2iC Sherman and blammo, he kills him. I make use of the
abandoned positions rule to assault the wrecked Sherman and move up my infantry
bases, and place my CiC Panther in the way of the Shermans with a Stormtrooper
move.
In his
turn, he gets one reserve, and he brings up the Stuarts. Lucky for him, as
there were no Canadians anywhere near the objective! He puts them near the
objective and targets the 251/17s. A single Typhoon shows up and he places it
near the Panther which was the furthest away.
The
Shermans move towards the CiC Panther, with the Firefly remaining behind to
take two shots with Semi-Indirect fire. The 251/17s all survive his shooting,
but I do lose a Panther to the Firefly. Luckily, my CiC isn’t killed and can
switch tanks.
The Typhoon
hits the Panther, despite it being a single flight, and then I roll a six to
bounce the rocket. Whatever the outcome of this game, I really have to give
Lady Luck a call about her comings and goings.

At the start of his turn 4
Turn 5:
Shermans
out in the open? Good times! I move my Panthers up, and shift the 251/17s to
get side/rear shots at the Stuarts. A round of shooting later, and now only two
Shermans still stand. Also, the Canadians no longer have a CiC! I roll badly
against the Stuarts and cannot convert my hits into successful firepower tests,
just bailing one.
No
airplane this time, but he does get one reserve. He brings on his Wasps, and
moves them into an optimal position next to all the open-topped halftracks.
This is going to hurt. He flames the 251/17s and Panzergrenadiers halftracks,
lose 3 and 2 respectively, meaning a platoon morale check for the
Panzergrenadiers, which I fail. The Stuarts add their fire, but fail to add to
the damage.
At the end of turn 5
Turn 6:
I
suddenly realize that I only need to kill one other platoon to force a company
morale check, which will be failed automatically. I move the Panthers into LoS
of the Shermans, and luck out with two hits and two successful firepower tests.
There’s no need to continue, and we call it a game.

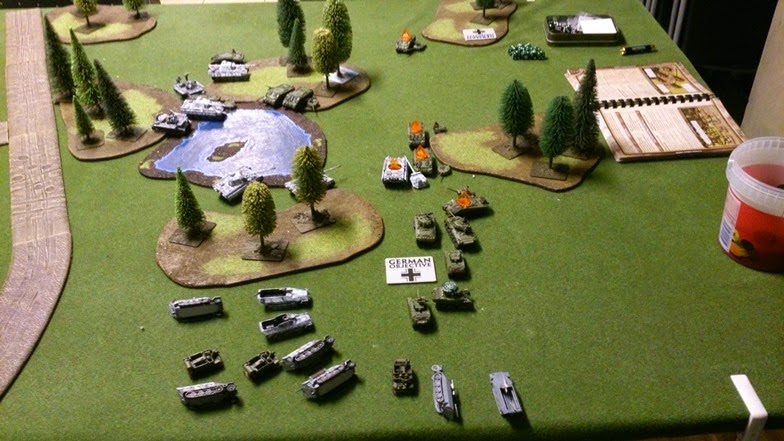
Chaos in the middle of the table
Hindsight and learning points
I had
quite some lucky breaks during this game. The Shermans not hitting my Panthers when
in their side armour for example, bouncing a Typhoon rocket on top armour, my
opponent not getting his reserves until later, it really helped me. On the
other hand, I also suffered some unlucky rolls.
Reluctant
motivation is a whole new thing for me, as I’m usually playing with Confident
briefings. Switching from a 50/50 chance to succeed, to 1 in 3, it’s not to be
taken lightly. Since Panthers don’t have Protected Ammo, I was really hoping
not to get bailed.
So how did
the briefing feel? It gave me a sense of control. Spearhead, together with the
rules of the Uhu and the infra-red equipment, meant that for the first few
turns, I was dictating the battle.
The
scenario also helped in this case, but for a first game, it went well.